Sunday, March 28, 2010

Diagonal Fringed Neckwarmer

This pattern was born out of my aversion to weaving in ends.  I love to use color and to blend colors, but the thought of having to weave in two ends for every time I changed colors is enough to immediately put a pattern in the reject category.

I had a bunch of Homespun scraps, from various projects.  A high-school-acquaintance-now-reconnected-through-Facebook-friend had published a beautiful book, Eagles of the Ashokan.  The colors in her photographs inspired me to use different colors of scrap Homespun, together, and what resulted was this neckwarmer.


This pattern is about as easy as patterns come.  All you need to know is how to chain, make single crochets, and tie knots.

Materials:
Scraps of any sort of yarn.  I used Homespun.
Crochet Hook: any hook that will go with your yarn.  I used a K hook.

Leaving an 8” tail, ch 60 (or any number of stitches that will result in a ring that fits easily over your head).  Join with a slip stitch to the first chain (ok, so I lied, you also need to know how to sl), being careful not to twist chain.  Fasten off, leaving an 8” tail.  Tie tails together into a square knot.

Row 1:  In the ch after the join, attach a new piece of yarn, leaving an 8” tail, and sc in each ch, around, including the joining stitch.  Fasten off, leaving an 8” tail.  Tie tails together into a square knot.

Row 2:  In the sc after the join, attach a new piece of yarn, leaving an leaving an 8” tail, and sc in each sc, around, including the joining stitch.  Fasten off, leaving an 8” tail.  Tie tails together into a square knot.

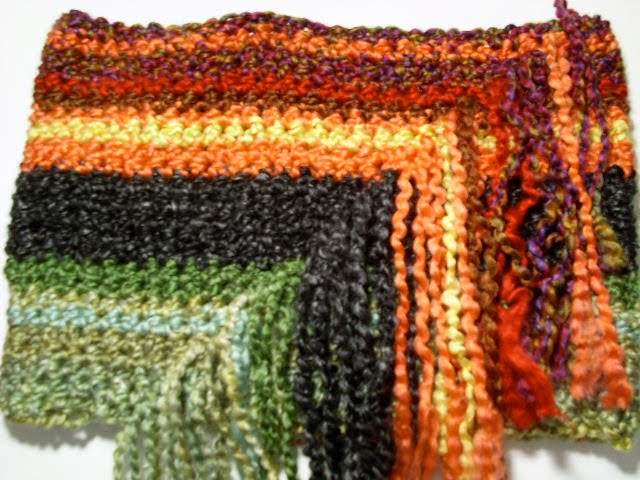
Repeat Row 2 until the neckwarmer is about 8” wide.  Change colors as you wish, every row, every few rows.  It's up to you.  Trim fringes to desired length.

Here's the front:

And the back:

Here's one with slightly different colors:

And some others:
Copyright © 2010 HELEN WANG.  All rights reserved.

Sold a bunny egg

Sold another Easter egg, yesterday, the bunny one.  It has been fun setting up my shop and linking to my facebook and my blog.  I wonder how long this'll last.  I hope I don't hate Etsy, in a few weeks, because I only sold a couple of eggs.

Saturday, March 27, 2010

Blogger and Etsy

I've been playing around on Blogger for the last couple of weeks and am learning a lot about layouts, backgrounds, banners, etc.  With the encouragement of friends, I finally listed something to sell on Etsy.  I've had the account since 2007 and have done nothing with it.  I posted my first item yesterday and it sold within an hour.  It must be beginner's luck, but it sure did me a lot of good towards my confidence.  I, quickly, listed two more items, and I fear I probably have jinxed myself.  Oh, what the heck, so I threw away 40 cents, oh well.  I also figured out how to post my Etsy items for sale on my blog.  LOVE figuring things out!

Friday, March 19, 2010

Vegan Coconut Biscuits


Vegan Coconut Biscuits 


I started out trying to come up with a nondairy Irish Soda Bread for Patsy. I figured I may as well get rid of the egg and make it vegan, too.

I made biscuits instead, because they don't take as long to bake, but you can easily plop all of the dough onto the silpat and make a loaf. You just have to bake it longer. These are surprisingly moist and tender, for having added no margarine or oil. I made a few plain ones, before adding shredded coconut to the rest of the dough. The plain ones didn't taste like they were made with coconut cream, at all. They didn't taste vegan (whatever that means). I would definitely make this bread again, even for my omnivore friends.

dry ingredients:
3 C flour
4 T sugar
1 t baking soda
1 t salt
1 T baking powder

wet ingredients:
flax fake egg (see below)
1 13.5-oz can coconut cream (not coco lopez)

1/2 C shredded coconut (optional)
granulated sugar (optional)

Sift dry ingredients together in mixing bowl. Stir wet ingredients together, in a separate bowl.

I used my KitchenAid mixer with the dough hook. Put sifted dry ingredients in mixing bowl. With machine on low, slowly pour wet ingredients into the dry ingredients. Stop occasionally to scrape down the sides of the bowl. Do not over mix. The dough will be very sticky.

At this point, I added coconut to part of the dough. This was an afterthought. I originally wanted to add raisins, but didn't have any. If you do want to add coconut, I would suggest adding it to the dry ingredients to save this step.

Drop dough by ice cream scoopful onto a silpat. Sprinkle with granulated sugar (optional) and bake for 20-25 minutes on 350°F, until lightly golden.

Flax Fake Egg
1 T finely ground flax seeds
2 T hot water

Heat over low heat. Stir continuously. Soon the liquid will become more and more colloidal. Let cool before using.

Monday, March 15, 2010

Vegetarian Meatloaf


I know, why bother? Why make a vegetarian meatloaf, when I have 5 pounds of brisket corning in the fridge? I've been curious about this vegetarian meatloaf recipe ever since I got the email from Recipezaar. The reviews were all good and the ingredients sounded like they'd go well together. I thought this would be a good addition to my collection of "leftover-busting" recipes to take care of those little pieces of cheese and jars of spaghetti sauce, that seems to take up so much valuable space.

I'm no vegetarian, but this loaf is better than most 
meatloaf recipes that I've tried. It is flavorful, moist, and with the exception of the egg and cheese, is nearly fat free. It is packed full of protein, fiber, and iron. All in all, a nutritious, one-pan dish. I wished I had remembered to add some chopped up leftover vegetables, but... next time.


Here is my version of the vegetarian meatloaf:


Ingredients:


2 C water
2 T soy sauce
1 C lentils
1 C rolled oats


Spice mixture:
1 t garlic powder
1 t dried oregano
1 T dried parsley
1 t Eric Spice
1 T paprika
1 t cayenne
1/2 t coarsely ground pepper

1 egg, beaten
2/3 C spaghetti sauce


1 medium red onion, chopped
1 C grated Asiago and Finlandia cheeses


2 T ketchup
1 T brown spicy mustard


Bring water and soy sauce to a boil.  Add lentils and simmer, covered, 25-30 minutes, until lentils are soft and most of the water has been absorbed.  Remove from heat.  Stir in oats and cover with lid for 5 minutes.

Fluff lentils and oats to help cool.  Partially mash with a potato masher.  I didn't over mash it, because I wanted it to be more meaty in texture, than mealy.


Add spice mixture and mix well.  Add egg and spaghetti sauce, mix well.  Lastly, add the onions and cheese and mix well.

Line a loaf pan with parchment paper and spoon mixture into pan.


Bake at 350°F for 30 minutes.  Cool in pan for about 10 minutes.


Place a cookie sheet over the pan and carefully invert the loaf onto the cookie sheet.


Remove and discard parchment paper.  Brush loaf with ketchup mixed with spicy brown mustard and bake for another 15 minutes, until the outside has caramelized.


Saturday, March 13, 2010

Corned Beef

I picked up a 5 lb brisket, yesterday, and started brining it for corned beef.  This is my first attempt at corning a brisket.  I used a combination of the recipe from Cook's Illustrated and Alton Brown's, but without saltpeter.  I didn't think it was necessary to have bright red meat, at the expense of nitrosamines.


Brine:
2 C water
1/2 C coarse Kosher salt
1/4 C brown sugar
2 bay leaves, crushed
1 t black peppercorns
1 cinnamon stick, broken into small pieces
1 t mustard seeds
1/2 t ground Jamaican allspice
1/2 t ground cloves
1/2 t ground thyme
1 t paprika
1 t crushed red peppers (couldn't help it)


Simmer brine over low heat, until salt and sugar have dissolved.  Remove from heat and let cool.

Poke a bunch of holes on each side with a meat fork and place in a large ziplock bag.  Pour cooled brine into bag, over brisket.  Close bag, removing as much air as possible.  Place bag in a container and allow to marinate in fridge.

Turn bag once a day and we'll see how it turns out in 5 days.

Thursday, March 11, 2010

Ranch, Shallot Biscuits

Ranch, Shallot Biscuits


Remember Jeff Smith, The Frugal Gourmet? He would be so proud of this recipe. I really love to "repurpose" food. I had about 1/2 cup of leftover Ranch dip that I knew nobody would touch again. I diluted it with enough skim milk to make 1 cup and used it in place of regular milk, in a good old fashioned biscuit recipe.


I also added my favorite recent find, the toasted fried shallots from the Chinese store, that I've been using in EVERYTHING. The package is huge and lasts forever. I would suggest storing any unused shallots in the fridge to keep it from going rancid. The resulting biscuits were very light and flavorful, reminiscent of these little Chinese scallion breads that I remember having at dim sum. I hope there'll be some left, when Austen gets home from school.

Dry ingredients:
2 cup all-purpose flour
4 teaspoons baking powder
1 tablespoon brown sugar
1/2 C fried shallots

Wet ingredients:
1/2 stick butter, sliced and freeze for 1/2 hour
1 cup milk/dip mixture

 In a medium bowl, combine dry ingredients. Mix well. Cut in butter until mixture resembles coarse crumbs. Stir in milk/dip mixture, just until moistened. Do not over mix. Flour hands and pull off about a 2 tablespoon-size piece of dough and form into discs, ~ 1/2" thick and 2" wide. Try not to over-handle dough. Place discs next to each other in an ungreased baking sheet. Let rest for 1/2 hr.


Preheat oven to 450°F. Bake for 10 to 12 minutes or until lightly browned. Serve warm.


Wednesday, March 10, 2010

Yarn logging is progressing nicely.  Got a bunch more bins done.

Sunday, March 7, 2010

Serrano Pepper, Cheese, and Toasted Shallots Skillet Cornbread

This recipe started out as a typical Southern skillet cornbread recipe, until I got to the wet ingredients.  I had no buttermilk, but I had a can of Pickled Serrano Peppers and half and half.  Sounds disgusting, but people put vinegar in milk to make buttermilk all the time, so why waste all the flavorful liquid, when I can take advantage of it?


The toasted shallots, I bought at the Chinese store.  The label said fried scallions.  They are dry and crunchy and very flavorful.  They're typically used as toppings in soups, but in my case, since I had no onions, they were a wonderful replacement.


dry ingredients:
3 C cornmeal
1 1/2 C flour
2 t baking powder
1/2 t baking soda
1 T sugar

wet ingredients:
2 eggs
1 3/4 C half and half
1 12-oz can Pickled Green Serrano Peppers, stems removed, chopped, liquid reserved
1 package shredded Cheddar and Jack cheese, reserving 1/2 C for top

1/2 C toasted shallots

1 T vegetable oil


Preheat oven to 400°F. Put 1 T vegetable oil in 10" cast iron skillet and swirl around to grease entire pan. Place pan in oven.

Sift dry ingredients and combine with wet ingredients and toasted shallots. Mix thoroughly and let sit for 10 minutes. The batter will start out thin, but will thicken as it sits (
I know. I was worried too, because I didn't have any cornmeal left to thicken the batter).

Pour batter into hot skillet and top with remaining cheese.


Bake for 40-45 minutes, turning skillet half way through (unless if you have a convection oven, then you don't have to do crap, except pull the bread out 10 minutes earlier. I need me a cool-ass oven.).


Run knife along edge of skillet. Place a plate over the skillet and flip. The cornbread should come out cleanly.


The organization of my yarn stash continues.  Ravelry is a great tool for logging in my yarn stash and keeping track of all of my projects.

I was able to get through all 3 drawers of the yarn chest in the living room:


And a couple of bins:


The tripod I got for myself, yesterday, for my birthday, is one of the best investments I've made in a long time.  Taking pics of my yarn stash is a breeze now.  I can set up the camera in one spot and change the yarn.

I'm really excited about getting my yarn together.  I feel like I'm being productive, as I go through each bin of yarn.

Friday, March 5, 2010

My yarn obsession has long taken over my life. I've tried, ineffectively, for a long time, to organize my stash. My new years resolution was to not buy any yarn this year, but I'm thinking about changing it to not buying any yarn, until all of my stash has been organized and I know exactly what I have.

The plan, for the moment, is to enter EVERYTHING into Ravelry and then redistribute so that all of the same yarns are stored together. If I enter one bin of yarn a day, I should be done with the yarn in the garage in a few weeks. If I enter one shelf a day of the yarn in the cats' room, it should take another week. The yarn in the living room should take another week or so. And the yarn in the workroom should take another week. So, in two months, I should have all my yarn entered, if I stick to the plan.

Here's bin #1